
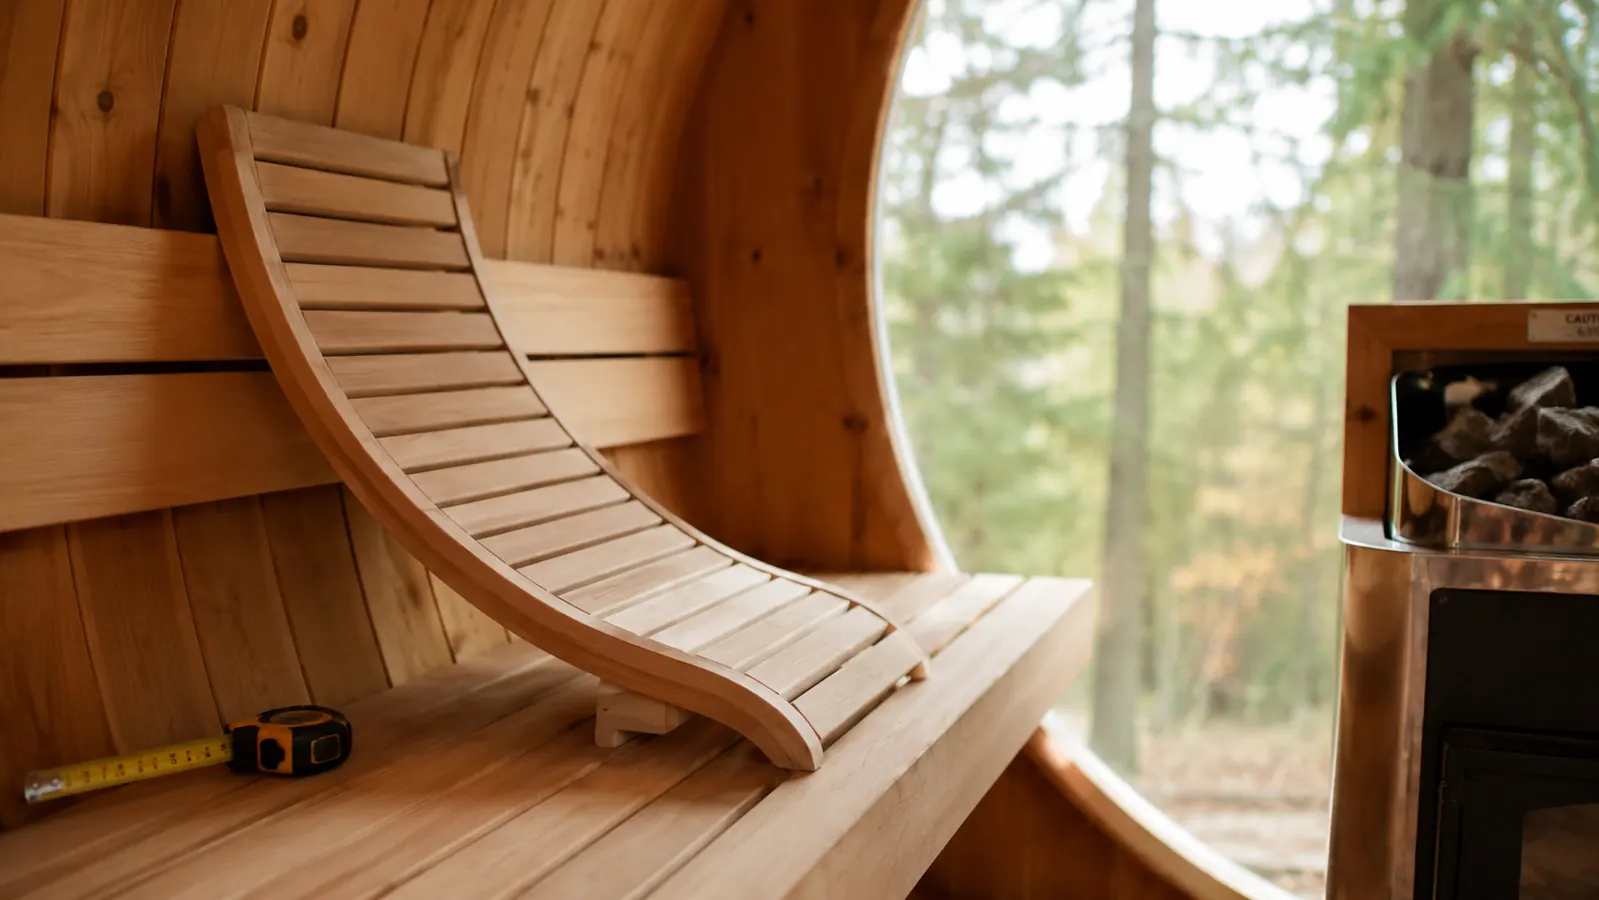
The first time I tried to figure out how to add a backrest to my home sauna, I assumed it would be as simple as setting a piece of wood on the bench and calling it done. It wasn't quite that simple, mostly because our barrel sauna has a curved wall and a bench depth that doesn't match every backrest on the market. I ended up returning one accessory before I found the Wiiyita Sauna Backrest, which was built with an S-shape profile that actually matched the way my lower back wanted to sit during a twenty minute session.
This guide is the sequence I actually followed, in the order that would have saved me a wasted return and one slightly clumsy first session where the backrest slid a few inches every time I leaned into it. If you're adding a backrest to a barrel, infrared, or cabin sauna, whether it's the Wiiyita or something similar in size and shape, the five steps below cover the parts that actually determine whether it feels solid or fights you every time you sit down.
Before you measure your bench, know what you're actually fitting it to.
The Wiiyita Sauna Backrest is the model I used for every step in this guide, and its slip-resistant feet and S-shape curve are what made the fit work in a curved barrel sauna. Check today's price and current availability before you start measuring your space.
Amazon Check Today's Price on Amazon →Step 1: Measure Your Bench Before You Buy Anything
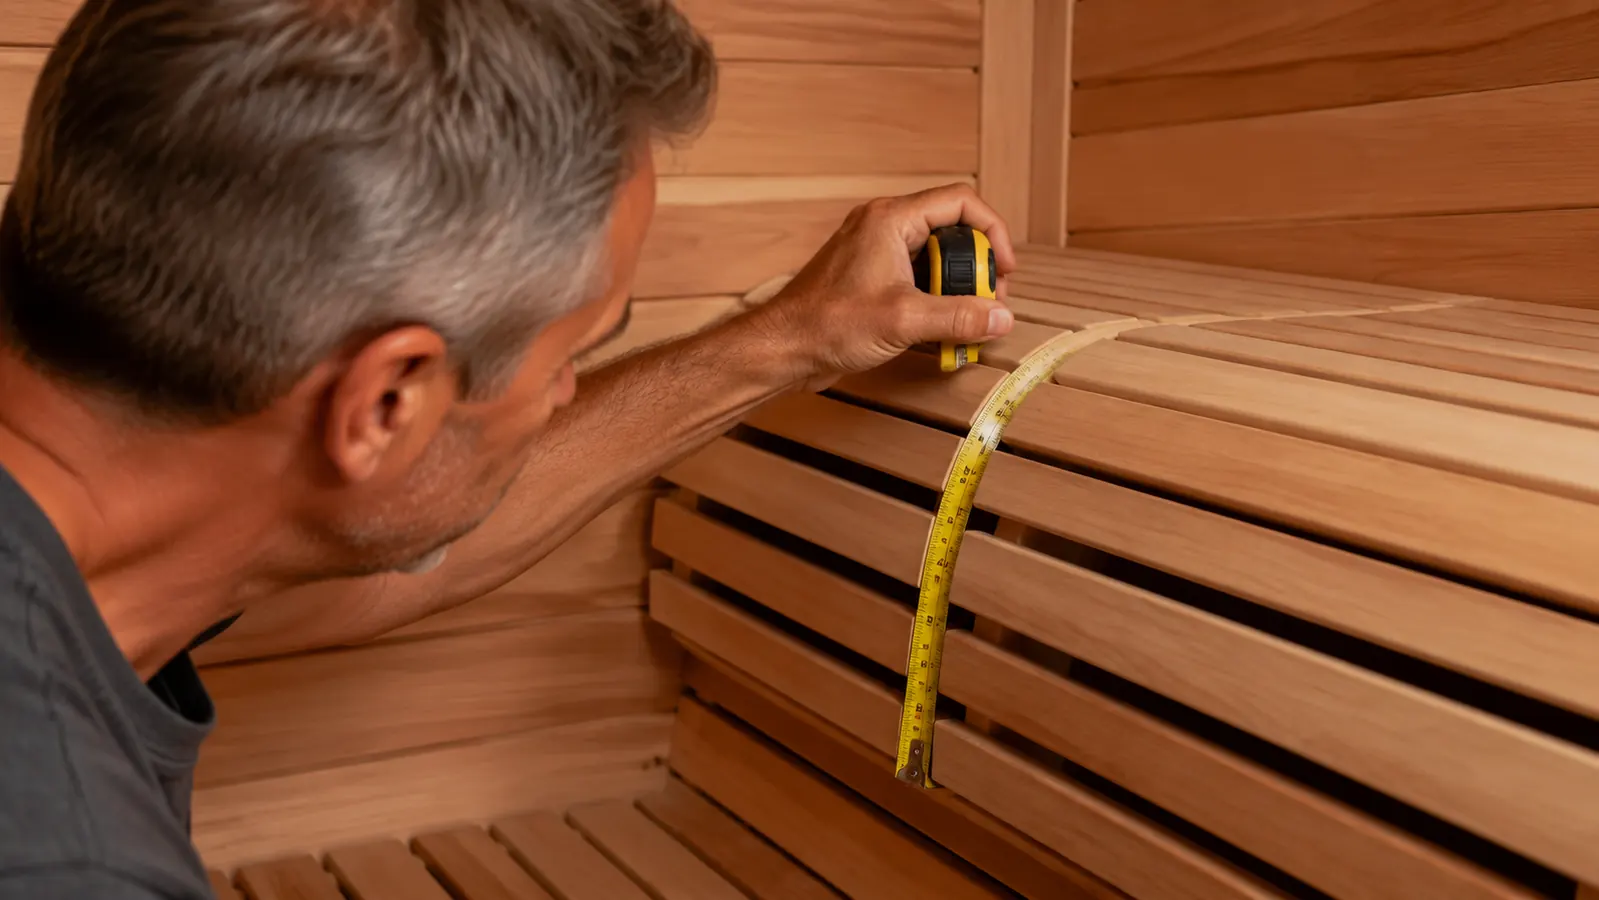
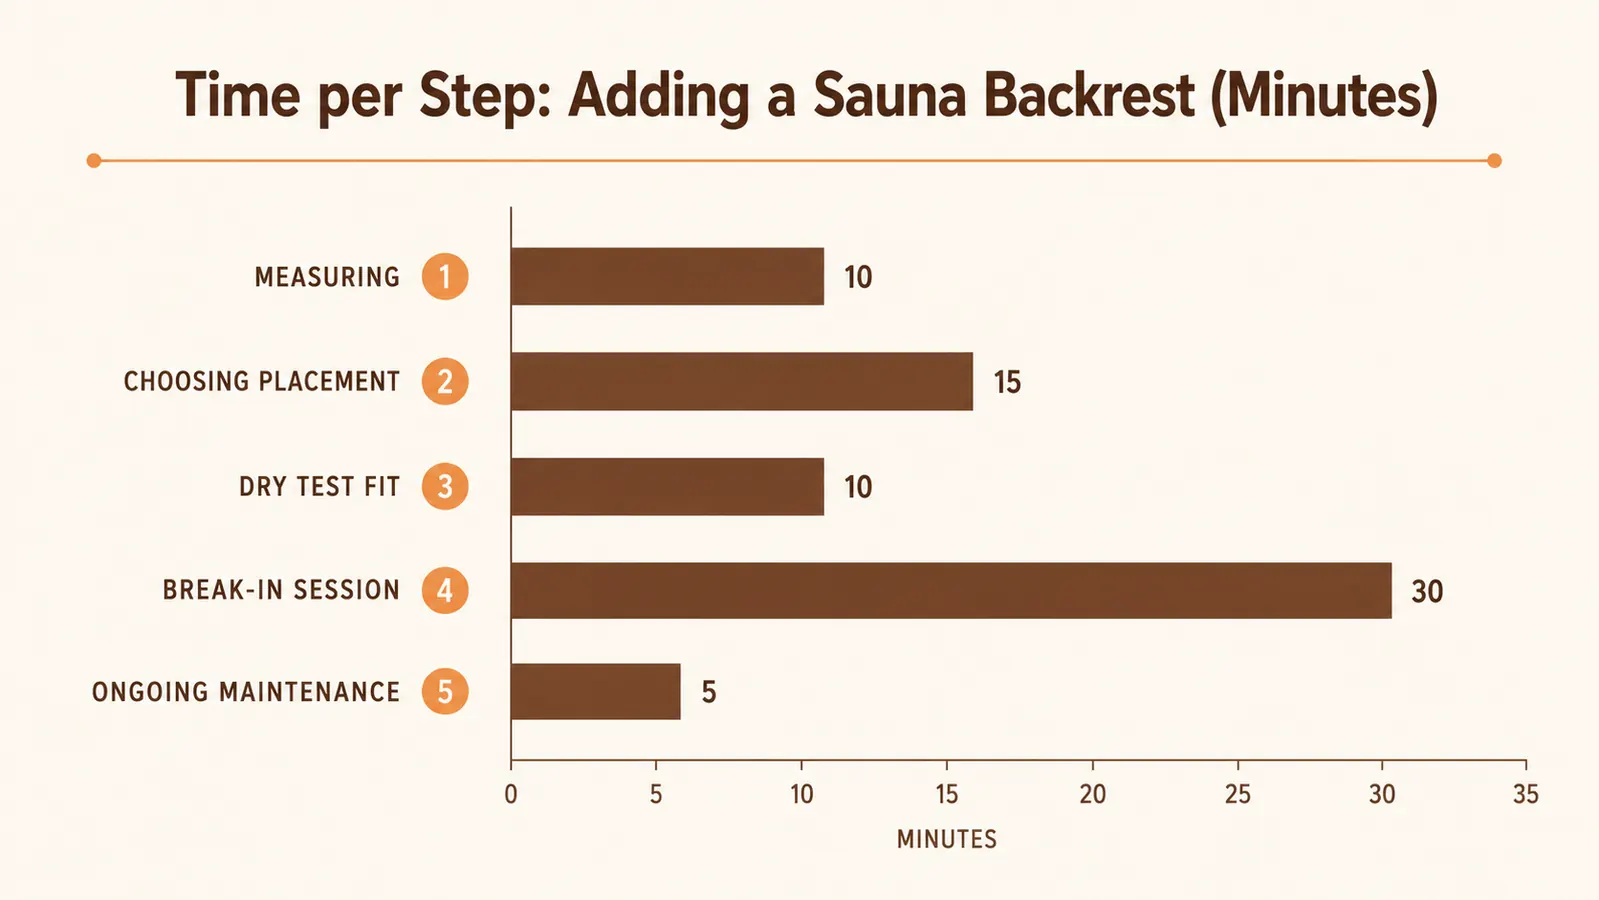
Do this before you order a backrest, not after it arrives. I pulled out a tape measure and checked three numbers on our bench: the depth from the wall to the front edge, the width of the space where I actually sit, and the curve of the barrel wall itself, since a backrest that fits flush against a flat cabin wall can rock or gap against a rounded one. Writing these three measurements down took about five minutes and saved me from a second return.
If you're setting a sauna backrest into an infrared cabin instead of a barrel, the wall behind your bench is almost certainly flat, which actually gives you a little more flexibility on placement since you're not fighting a curve. Either way, compare your bench depth against the backrest's footprint from the product listing before you order, not after, because a backrest that's deeper than your bench will hang off the front edge and feel unstable the moment you lean back into it.
I also measured the height from the bench seat to where my mid-back naturally sits, since that told me whether I wanted the backrest positioned closer to the wall or a few inches forward on the bench. A taller household member and a shorter one in the same sauna will usually want the backrest sitting in slightly different spots, so if more than one person uses the space regularly, expect to adjust the placement a little between sessions rather than finding one perfect spot for everyone.
The tools for this step are simple: a tape measure, a pencil, and ideally a small torpedo level if your bench isn't perfectly flat. I keep all three in a small bag near the sauna now, since I've reached for them again every time I've adjusted the backrest's spot after a deep clean. None of this requires any drilling or permanent hardware, which is part of why fitting a sauna backrest is a lot friendlier than most sauna upgrade projects.
Step 2: Choose the Right Placement for Your Sauna Type
A barrel sauna, an infrared cabin, and a traditional wood-paneled sauna room each present a slightly different placement problem. In our cedar barrel, the curved wall meant the backrest needed to sit with its widest point centered on the curve, angled slightly so the S-shape followed the bend of the bench rather than fighting against it. It took two tries to find that sweet spot, and once I did, I used a pencil to mark the corners lightly on the wood so I could return the backrest to the exact same spot after cleaning.
If your sauna has a flat back wall instead, like most infrared cabins, placement is more forgiving. You're mainly deciding how close to the wall you want the backrest sitting and whether you want it centered on the bench or offset toward one end near a window or vent. I tested a friend's infrared cabin session with the same backrest set close to the wall, and the flat surface made it noticeably more stable there than it initially was against our barrel's curve, since there was no gap for it to rock into.
A traditional wood-paneled sauna room, the kind with a straight bench built into the wall rather than a barrel or a prefab cabin, usually splits the difference between the two. The wall behind the bench is flat like an infrared cabin, but the bench itself is sometimes narrower, so double check depth here too before assuming a flat wall automatically means an easy fit. I've heard from a couple of readers who assumed flat meant automatic and skipped the measuring step entirely, only to find the backrest hanging half an inch off the front edge of a narrower built-in bench.
Whatever your sauna type, leave a little room behind the backrest for airflow rather than jamming it flush against the wall. A finger's width of space kept ours from trapping moisture against the wood and made it easier to lift out for cleaning between uses. It's a small detail, but it's the kind of thing that's much easier to plan for now than to fix once the backrest has been sitting in one spot for a few weeks.
Step 3: Dry-Fit It Before Your First Heated Session
Set the backrest in your chosen spot while the sauna is cold, then sit against it exactly the way you would during a real session. This is where the slip-resistant feet on the Wiiyita earned their keep. I pressed down on each corner to check that all four feet were making solid contact with the bench, since even a slightly uneven bench board can leave one corner floating and the whole backrest rocking when you lean into it.
Lean back with your full weight, not just a light test push. I skipped this step the first time and found out during an actual session that the backrest shifted about two inches forward every time I settled into it, which meant repositioning myself mid-session instead of just relaxing. A proper dry-fit test catches that problem while you can still adjust placement calmly, rather than while you're already warm and would rather not be fussing with furniture.
If you notice any sliding during the dry-fit, a thin strip of rubber shelf liner under the back feet solves it without any permanent modification to the bench. I added a small piece under the two rear feet in our barrel sauna, since the curve gave the backrest a little more room to slide than a flat wall would, and it's held its position through every session since.
It's also worth dry-fitting with more than just your own weight if other people in your household will be using the sauna too. My husband Tom is a good six inches taller than I am, and when he leaned back the first time, the backrest sat noticeably lower against his shoulders than it did against mine. We didn't change the placement for that, since the S-shape still supported his lower back fine, but it's the kind of difference worth noticing during a dry-fit rather than discovering mid-session.

Step 4: Run a Short Break-In Session Before Using It for Real
Wood accessories added to a sauna, including a backrest, benefit from a short low-heat break-in before your first full session. I ran the barrel sauna at a moderate setting for about fifteen minutes with the backrest in place and the door cracked, mostly to let any packaging residue and the natural wood scent settle before sitting directly against it for a full twenty or thirty minute session.
This step also gave me a chance to check how the wood responded to heat in its new spot. The Wiiyita's finish held up fine against the barrel's ambient temperature, but I did notice it warmed up faster near the lower slats closest to the heater, which is worth knowing before you accidentally lean your bare shoulder against a spot that's warmer than you expected on your first real sitting.
Once the break-in session is done, your first real sitting is really no different from any other. Set your usual temperature and timer, sit against the backrest the way you tested it in Step 3, and pay attention to whether it holds its position for the full session. If it does, you're done adjusting. If it shifts at all, go back to the rubber liner trick from Step 3 before your next use.
Give yourself the first week to fine-tune rather than expecting the fit to be perfect on day one. I moved ours about an inch closer to the wall after the third session, once I had a better feel for where my shoulders naturally landed once I was actually warm and relaxed rather than just sitting down cold for a test. That small adjustment made a bigger difference than I expected, and it only became obvious after a few real sessions instead of a single dry-fit.
Step 5: Clean and Maintain the Wood So the Fit Lasts
A wooden sauna backrest needs a little more upkeep than a bare bench, mostly because it's absorbing sweat and moisture at a closer angle to your back than the bench itself. After each session, I wipe the Wiiyita down with a dry cloth and lean it against the wall rather than leaving it flat on the damp bench, which lets air move around it and dries it faster between sessions.
Once every week or two, I pull it out entirely and let it air dry somewhere outside the sauna room for a few hours, which has kept the wood grain looking the same as it did when I first set it in the barrel. If you skip this and leave it in place constantly, expect the finish to dull faster and the feet to hold onto moisture longer than they should, which is when a backrest starts feeling less stable even if the placement itself hasn't changed.
I also do a quick stability check every month or so, pressing down on each corner the same way I did during the original dry-fit in Step 3. Wood shifts slightly with humidity and heat cycles over time, and catching a corner that's started sitting a little proud of the bench early is a lot easier than dealing with a wobble that's crept in gradually without you noticing. Four months in, ours has needed exactly one small adjustment, and the monthly check is what caught it before it became annoying.
What Else Helps
A couple of small additions made the whole setup more comfortable than the backrest alone would suggest. I keep a thin folded towel draped over the top edge of the backrest during longer sessions, mostly for a little extra cushion against the wood grain on my shoulders. I also started marking the backrest's exact placement with a small pencil dot in an inconspicuous spot on the bench, so returning it to the same position after cleaning takes seconds instead of another round of trial and error.
If your sauna sessions run on the longer side, a small neck-height cushion or rolled towel placed at the top of the backrest is worth trying too. I don't use one every session, but on evenings when I'm staying in for closer to thirty minutes instead of my usual twenty, that extra bit of support at the top keeps my neck from getting stiff by the end, which the backrest alone handles well for the lower back but wasn't really designed to solve on its own.
Fitting the backrest took an afternoon. Finding the exact spot where it stopped sliding and started feeling like part of the bench took a couple of sessions after that.
Ready to give your bench a backrest that actually stays put?
Check today's price and current availability on the Wiiyita Sauna Backrest before you start measuring your bench and planning where it will sit.
Amazon Check Today's Price on Amazon →